How to add a reply to blogger comment

Generally the default blogger comment no choice to repond or reply to comment to each different comment. Therefor i will discuss how to make a reply button on the blogger comment. This is a trick blogger are relly helpful and you have a choice of reply comments in just view steps.

This is an example screenshoot


To view the demo of the screenshoot you can see on this blog: Blog demo-Reply comments

How to add a reply to blogger comment


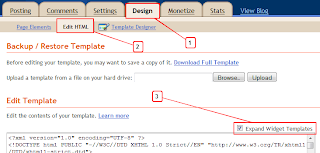
1. Select "Design" in your blogger dashboard, click>> "Edit html" do not forget to tick the box 'Expand widget tempalte " 


2. Find the following code ( Use ctrl+f to find a code )
<data:commentPostedByMsg/>
Or
<data:comment.body/> 
3. Once you find the code, copy the code below and faste it under the code above:
<a href='http://www.mybuxx.com'><img alt='Best Blogger Tips' src='https://blogger.googleusercontent.com/img/b/R29vZ2xl/AVvXsEghev6CuaZ9GBi02aEhYUp1YbNZv91pyFfh9QEs5C4xkGGBRHXWTRUjFNPwW4d2CJRhFgoKyD-fJLLN_pdWYdQUnVeuMkvZd719UdPvBe9orxy6gLGH_QJTr9Mk0xOZX32Xl-sQtk82tZd9/s1600/best+blogger+tips.png'/></a><span class='comment-reply'><a expr:href='&quot;https://www.blogger.com/comment.g?blogID=YOUR-BLOG-ID&amp;postID=&quot; + data:post.id + &quot;&amp;isPopup=true&amp;postBody=%40%3C%61%20%68%72%65%66%3D%22%23&quot; + data:comment.anchorName + &quot;%22%3E&quot; + data:comment.author + &quot;%3C%2F%61%3E#form&quot;' onclick='javascript:window.open(this.href, &quot;bloggerPopup&quot;, &quot;toolbar=0,location=0,statusbar=1,menubar=0,scrollbars=yes,width=400,height=450&quot;); return false;'>[Reply to comment]</a></span><a href='http://www.mybuxx.com'><img alt='Best Blogger Templates' src='https://blogger.googleusercontent.com/img/b/R29vZ2xl/AVvXsEghev6CuaZ9GBi02aEhYUp1YbNZv91pyFfh9QEs5C4xkGGBRHXWTRUjFNPwW4d2CJRhFgoKyD-fJLLN_pdWYdQUnVeuMkvZd719UdPvBe9orxy6gLGH_QJTr9Mk0xOZX32Xl-sQtk82tZd9/s1600/best+blogger+tips.png'/></a>
 4. Next, on the red code. you must enter your blog id to the code. BLog ID is a number that appears in the url, look the following example.
Once you find your blog id, then add your blog id in the html code above in red colour.

5. Save the template. Look your comments.

Hopefully this article usefull for you. For suggestions and critiques please post your comment.
Read Full Post

How to change fonts on the blogger

After fiddling with html and css code to change font in blogspot/blogger and i found a way to chage the font bloggers. For years, bloggers and web design using a simple font styles and templates for their blogs. But now google has launched their new service the google web fonts. This service allow us to use custom fonts on the font of blogger to the google directory for use on our blog/website.

I'l give you the steps to change the fonts on the blog so your blog looks more beautiful.

How to change fonts on the blogger

1. Log into your blogger account. 
2. Select the "design" the blogger dashbosrd you continue to click>> "Edit html" do not forget to tick the box "Expand widget template "
 
3. Find a piece of code <head> and save the code below after/below code <head> 
<link href='http://fonts.googleapis.com/css?family=Ubuntu:bold' rel='stylesheet' type='text/css'/>
<link href='http://fonts.googleapis.com/css?family=Vollkorn' rel='stylesheet' type='text/css'/>
<link href='http://fonts.googleapis.com/css?family=Lobster' rel='stylesheet' type='text/css'/>
<link href='http://fonts.googleapis.com/css?family=Smythe' rel='stylesheet' type='text/css'/>
<link href='http://fonts.googleapis.com/css?family=Philosopher' rel='stylesheet' type='text/css'/>
<link href='http://fonts.googleapis.com/css?family=Tangerine' rel='stylesheet' type='text/css'/>
<link href='http://fonts.googleapis.com/css?family=Holtwood+One+SC' rel='stylesheet' type='text/css'/>
4. Next, find the 
font-family: 'arial', Georgia, Times, serif; 
Note:
Change the blue code with the green font code

Fow example:
font-family: 'arial', Georgia, Times, serif; (arial change to Smythe) 
the change like this
font-family: 'Smythe', Georgia, Times, serif; 


You can also set the font to appear on:

  • Header
  • Blog title
  • Post artices
  • Sidebar
  • Footer
  • Or wherever you like
Hopefully this article can help you to make your blog beautiful.
Read Full Post

Acrobatic + CSS Horizontal Menu With jQuery

Acrobatic HORIZONTAL MENU 

Once before I explain about the Light Horizontal Hover Menu , now I will give you another new tips that make a horizontal menu at sisipi effect jQuery.


That is, when the mouse cursor highlight of this menu, then one of these menus will be tucked away or turned upside down.
And also I made this post is actually at the request of one of my blogger friends: 


The following stages make acrobatic HORIZONTAL MENU:

1. Login to your Blogger
2. Select Plan ---> EDIT HTML
3. Save the following CSS code above ]]></ b: skin>

ul # topnav { margin: 10px 0 20px; padding: 0; list-style: none; font-size: 1.1em; clear: both; float: left; width: 100%; } ul # topnav li { margin: 0; padding: 0; overflow: hidden; float: left; height: 40px; } ul # topnav a, ul # topnav span { padding: 10px 20px; float: left; text-decoration: none; color: # fff; text-transform: uppercase; clear: both; height: 20px; line-height: 20px; background: # 1d1d1d; } ul # topnav a {color: # 7bc441;} ul # topnav span { display: none; } span {ul # topnav.v2background: url (http://lh5.ggpht.com/_7ZIYPUkIUEw/TL0HX2yw0sI/AAAAAAAAAB4/5tZqAjpcOnE/menu.png) repeat-x left top; } ul # topnav.v2 a { color: # 555; background: url (http://lh5.ggpht.com/_7ZIYPUkIUEw/TL0HX2yw0sI/AAAAAAAAAB4/5tZqAjpcOnE/menu.png) repeat-x left bottom; }
4. Then find the following code
<div id='header-wrapper'> <b:section class='header' id='header' maxwidgets='1' showaddelement='no'> <b:widget id='Header1' locked='true' title='test (Header)' type='Header'/> </ B: section> </ Div>
Notes:
To store this menu, you are not required / required to keep it just below the above code, you can keep them in place to suit your template.

5. Save the following code right after the above code (optional) 
<ul class='v2' id='topnav'> <a href='/' title='HOME'> HOME </ a> </ li> <a href='#' title='MENU 1'> MENU 1 </ a> </ li> <a href='#' title='MENU 2'> MENU 2 </ a> </ li> <a href='#' title='MENU 3'> MENU 3 </ a> </ li> <a href='#' title='MENU 4'> MENU 4 </ a> </ li> <a href='#' title='MENU 5'> MENU 5 </ a> </ li> <a href='#' title='MENU 6'> MENU 6 </ a> </ li> </ Ul>
6. Now you save the following script above </ head> 
<script src='http://ajax.googleapis.com/ajax/libs/jquery/1.3/jquery.min.js' type='text/javascript'/> <script type='text/javascript'> $(document).ready(function() { $(&quot;#topnav li&quot;).prepend(&quot;<span/>&quot;); //Throws an empty span tag right before the a tag $(&quot;#topnav li&quot;).each(function() { //For each list item... var linkText = $(this).find(&quot;a&quot;).html(); //Find the text inside of the a tag $(this).find(&quot;span&quot;).show().html(linkText); //Add the text in the span tag }); $(&quot;#topnav li&quot;).hover(function() { //On hover... $(this).find(&quot;span&quot;).stop().animate({ marginTop: &quot;-40&quot; //Find the span tag and move it up 40 pixels }, 250); } , function() { //On hover out... $(this).find(&quot;span&quot;).stop().animate({ marginTop: &quot;0&quot; //Move the span back to its original state (0px) }, 250); }); }); </script>
7. Save your Template

^ ^ Additional:
Menus I described above is the appearance when the mouse to highlight a back somersault + Background is writing it, if you just want the writing is turned upside down, Please Use the code below: 
<ul id='topnav'> <a href='/' title='HOME'> HOME </ a> </ li> <a href='#' title='MENU 1'> MENU 1 </ a> </ li> <a href='#' title='MENU 2'> MENU 2 </ a> </ li> <a href='#' title='MENU 3'> MENU 3 </ a> </ li> <a href='#' title='MENU 4'> MENU 4 </ a> </ li> <a href='#' title='MENU 5'> MENU 5 </ a> </ li> <a href='#' title='MENU 6'> MENU 6 </ a> </ li> </ Ul> 
May be useful and please try. Thanks

COMPLEMENTARY:
  • Please ENTER above you replace text with text that will show you the menu, and do not forget to also fill Linknya
Read Full Post

Light Hover With CSS Horizontal Menu For Blogger

Light Hover With CSS Horizontal Menu For Blogger. This post I will try to give you tips on the menu bloggers . The title that I take is Light Horizontal Hover Menu meaning Menu Horizontal / Horizontal to be shiny as the highlight by the cursor. 
To make it please you follow the stages below:

1. Blogger Log Into You
2. Select Design
3. Select Edit HTML
4. Save the following CSS code above </ head>
<style type='text/css'> # Nav { width: 100%; margin-left:-40px; background: url (https://blogger.googleusercontent.com/img/b/R29vZ2xl/AVvXsEjH4Nv_4AjdRuag1FS-nHdyxMzTMpaJziIT0ZQz5r7weOE4mg1o9tvsC_Oy-fS4ug-oSnYmsfUHepmZK_xbF6aixxCGdaip4Ok2ytHiL9wAAkemBASjrHLCZgj-58yqQN6S3fmELFVVJP_s//) repeat-x; 
# Nav li { float: left; display: block; 
# Nav li a { float: left; display: block; padding: 12px 18px 12px 18px; text-transform: uppercase; text-decoration: none; background: url (http://lh3.ggpht.com/_7ZIYPUkIUEw/TNWkoQFUrEI/AAAAAAAAAFA/3RlsV_UOXlo/navi-bg.jpg) no-repeat top right; color: # ffffff; 
# Nav li a: hover { background: url (http://lh3.ggpht.com/_7ZIYPUkIUEw/TNWkoQFUrEI/AAAAAAAAAFA/3RlsV_UOXlo/navi-bg.jpg) no-repeat right-40px; color: # ffffff; text-decoration: none; 
ul # nav li.activee a, ul # nav-cat a {li.current color: # fff; background: url (http://lh3.ggpht.com/_7ZIYPUkIUEw/TNWkoQFUrEI/AAAAAAAAAFA/3RlsV_UOXlo/navi-bg.jpg) no-repeat right-80px; 
# Nav li ul { display: none; </ Style>
5. Now you find the following code:
 <div id='header-wrapper'> <b:section class='header' id='header' maxwidgets='1' showaddelement='no'> <b:widget id='Header1' locked='true' title='test (Header)' type='Header'/> </ B: section> </ Div>
6. Save the following code after the code above  
<ul id='nav'> 
<li class='activee'> <a href='/'> Home </ a> </ li> 
<a href=' # 'title='MENU 1'> MENU 1 </ a> </ li> 
<a href=' # 'title='MENU 2'> MENU 2 </ a> </ li> 
<a href=' # 'title='MENU 3'> MENU 3 </ a> </ li> 
<a href=' # 'title='MENU 4'> MENU 4 </ a> </ li> 
<a href=' # 'title='MENU 5'> MENU 5 </ a> </ li> 
<a href='#' title='MENU 6'> MENU 6 </ a> </ li> 
</ Ul>
Description: Please replace the word MENU on the menu are you going to show, do not forget to also fill out a link that will be addressed by your menu. 


Example: 
<a href='http://www.mybuxx.com/' title='Blog Tutorial'> Blog Tutorial </ a> </ li>
7. Save the template you 
Hopefully useful and Thanks 
Read Full Post

Create and Modify Breadcrumb Navigation In Blog

MAKE MODIFICATIONS TO BLOG NAVIGATION breadcrumb

actually post that discusses the breadcrumb navigation is already widely known, but I'm sure of many who know it, still more who do not know about making this breadcrumb navigation. 
With the breadcrumb navigation makes it easier for readers because they will know where their current position (was reading an article page). Usually the storage location of the breadcrumb navigation is located above the title of our posts that will appear only on post pages only.


To make this breadcrumb navigation you can follow the steps below: 


1. Login to your blogger 
2. Select Plan ---> EDIT HTML (check expand widgets template) 
3. Save the following CSS code above ]]></ b: skin> 

. Breadcrumbs { padding: 5px 5px 5px 0; margin: 0; font-size: 95%; line-height: 1.4em; border-bottom: 4px double # cadaef; }
4. then leaving you to find the following code:
<div class='post hentry uncustomized-post-template'>
5. Save the following code after the code No.. 4
<b:if cond='data:blog.homepageUrl == data:blog.url'> <b:else/> <b:if cond='data:blog.pageType == "item"'> <div class='breadcrumbs'> Browse »<a expr:href='data:blog.homepageUrl'> Home </ a>» <b:if cond='data:post.labels'> <b:loop values='data:post.labels' var='label'> <a expr:href='data:label.url' rel='tag'> <data:label.name/> </ a> <b:if cond='data:label.isLast != "true"'>, </ b: if> </ B: loop> </ B: if> »<data:post.title/> </ Div> </ B: if> </ B: if>
6. Save your template

The result will be like this:
 

Browse »Home» Labels, labels, labels »Post Title
Notes:
  • You can replace the word Browse and Home on the above code, for example pake your word here, Houses, etc.
  • color on the bottom line for breadcrumb navigation you can change the CSS code above exactly code # cadaef

Actually making the navigation is complete, but I'll share a little to modify this breadcrumb navigation:

^ ^ Changing the Home with Pictures

To change the word HOME 
to the picture you can add the following code:

<img alt='Home' src=' HOME YOUR IMAGE URL'/>
Paste in the HTML above to replace the word HOME, so the result is like this: 
<b:if cond='data:blog.homepageUrl == data:blog.url'> <b:else/> <b:if cond='data:blog.pageType == "item"'> <div class='breadcrumbs'> Browse »<a expr:href='data:blog.homepageUrl'> <img alt='Home' src=''/> YOUR HOME IMAGE URL </ a>» <b:if cond='data:post.labels'> <b:loop values='data:post.labels' var='label'> <a expr:href='data:label.url' rel='tag'> <data:label.name/> </ a> <b:if cond='data:label.isLast != "true"'>, </ b: if> </ B: loop> </ B: if> »<data:post.title/> </ Div> </ B: if> </ B: if>
The result will be like this: 


May be useful, can be practiced and thank you.
Read Full Post

How to make a banner ad on the sidebar

This time I will discuss how to create a banner ad on the sidebar.
 
box serves banner ads to advertise, with a banner ad this blog will look more professional. There is also the possibility of visitor / visitors to the blog you would like to put ads on your blog. you stay put tariffs.


Here's an example

How to create a banner ad on the sidebar
Ok, immediately wrote tough steps below.
1. Log into your blogger account.
2. Select "Design" in your blogger dashboard, click>> "Edit html" do not forget to tick the box 'Expand widget tempalte "
3. then look for the code snippet below Find the following code (use ctrl + f to search bar to search faster code) 
]]></ B: skin>
4. You must copy the code below the above code on no. 3 
/ *** *** 125x125 Advertising / . Deinieziklan { margin-top: 10px; margin-bottom: 10px; padding: 10px 0 5px 5px; border: 1px solid # FFF; text-align: center . Denieziklan img { margin: 0px 4px 0px 4px; padding: 3px; text-align: center; border: 1px solid # c0c0c0 . Denieziklan img: hover { margin: 0px 4px 0px 4px; padding: 3px; text-align: center; border: 1px solid # 99CC00; }
 5. After saving the above code, then save your template. After the save search code snippet below.
<div id='sidebar-wrapper'>
6. Copy the code below just below the code above.
<div class='deniezsiklan'> <a href='http://www.mybuxx.com/2011/07/advertise-here.html' target='_blank'> <img alt = 'Photobucket' border = '0 'src =' http:// i1125.photobucket.com/albums/l593/Deniez_Kamaitachi/advertise-here125.png'/></ a> <a href='http://www.mybuxx.com/2011/07/advertise-here.html' target='_blank'> <img alt = 'Photobucket' border = '0 'src =' http:// i1125.photobucket.com/albums/l593/Deniez_Kamaitachi/advertise-here125.png'/></ a> <a href='http://www.mybuxx.com/2011/07/advertise-here.html' target='_blank'> <img alt = 'Photobucket' border = '0 'src =' http:// i1125.photobucket.com/albums/l593/Deniez_Kamaitachi/Banner300x250.jpg'/></ a> <a href='http://OneDollarRiches.com/3036 'target='_blank' title='OneDollarRiches'> <img height = '125px' src = 'http://i1125.photobucket.com/albums/l593/ Deniez_Kamaitachi/onedollarriches-125x125.jpg 'width = '125px'/></ a> <a href='http://ity.im/?ref=24444' target='_blank'> <img src='http://ity.im/promo/getpaid125-2.gif'/> </ a > <a href='http://signup.clicksor.com/pub/index.php?ref=161095' target='_blank'> <img src='http://signup.clicksor.com/publisher/images/pub/125x125_1.gif'/> </ a> <A src = 'http://tracking.hostgator.com/img/Shared/125x125.gif'/></ a> </ Div>
7. Or it could also "add gadget">> continue to add "html / javascript" enter the above code.
8. Next we edit the code above.

  • Replace the red code with your ad html code
9. Save your template, then Continue to see the results.

Hopefully this article useful to you. for suggestions and critiques please post your comment
Read Full Post

How To add Subscribe & Follow Widget

How To add “Subscribe & Follow” Widget

Here's and example

1. Go to "Design->Add a gadget"
2. Copy the following Code:
<center>
<form style="padding-top:6px;" id="subscribe" action="http://feedburner.google.com/fb/a/mailverify" method="post" target="popupwindow" onsubmit="window.open('http://feedburner.google.com/fb/a/mailverify?uri=mybuxx/sFvZ', 'popupwindow', 'scrollbars=yes,width=550,height=520');return true">
<input type="text" value="Enter your email address..." id="subbox" onfocus="if (this.value == &#39;Enter your email address...&#39;) {this.value = &#39;&#39;;}" onblur="if (this.value == &#39;&#39;) {this.value = &#39;Enter your email address...&#39;;}" name="email" style="width:170px;" />
<input type="hidden" value="Make money online name="uri" />
<input type="hidden" name="loc" value="en_US" />
<input style="
        padding-left:5px;
        padding-right:5px;
        padding-top:1px;
        border: 1px solid #198DC9;
        cursor: pointer;
        -moz-border-radius: 15px 15px 15px 15px;
        background-color: #198DC9;;
        color: #FFFFFF;
        font: normal 15px Times New Roman;"
type="submit" value="Subscribe" />
</form>
</center>
<center>
<table border="0">
<tr>
<td>
<a href="http://twitter.com/deniezdayerz" target="_blank" title="Follow Me On Twitter">
<img style="width:42px; height:42px;" src="https://blogger.googleusercontent.com/img/b/R29vZ2xl/AVvXsEitstBeV6lfutURdfq4D6dWsRVJAYOrI3aMhrjZ_AfmdomG6KQQyd9YM5SGrQMrbS8YlKGyMy9bQ65AezXo5HVoLxVDtuCY06Ih8mCVkBfy364M93Ob4reIX_7dYn6r6O7WAM34ehQqgA0/s800/EAB_twitter%20icon.png" /></a>
</td>
<td>
<a href="http://feeds.feedburner.com/mybuxx/sFvZ" target="_blank" title="Subscribe Via RSS">
<img style="width:42px; height:42px;" src="https://blogger.googleusercontent.com/img/b/R29vZ2xl/AVvXsEj8Ayx3nVVttQqTRFUAuOsYg5L5lT-AhP4Uqt67qryCy7gHWruGzf5gO9g1IOdDSZqCPW7wiAkvxVPFHEBXRxfFx5rWqztK53NCCUqePqiaiOr6Blz-CE5CHJ8f_5I_Rlt2B6peEgUXf58/s800/EAB_rss.png" /></a>
</td>
<td>
<a href="http://www.facebook.com/pages/deniez.dayerz" target="_blank" title="Find Us On Facebook">
<img style="width:42px; height:42px;" src="https://blogger.googleusercontent.com/img/b/R29vZ2xl/AVvXsEh_hTJui2S85oDoVXPElwmS144BI_j2Nmd98of4aM0UlhZP9U2IxOZcMa2XcQmcP3l6VWgE-5Co9-DM9O0AghRl2X9IIg-caMLOycn6cXv-sunqn6Oril-NAj_zTcjNkuXTe1gzQhcdSE0/s800/EAB_facebook icon.png" /></a>
</td>
<td>
<a href="http://technorati.com/faves?sub=addfavbtn&add=http://www.mybuxx.com" target="_blank" title="Add To Technorati">
<img style="width:42px; height:42px;" src="https://blogger.googleusercontent.com/img/b/R29vZ2xl/AVvXsEh9eMe5vilftPj8BtPwYrG3qtOpyBOw-0NjxyVnrPiTNXfcQc8VJjlzeCcjlZT7lgWkhWx8OdM48TzuvQJmAe4-evJCWRWWXxpjy7mwk-uv9ax9-C6NGAUL_c5EHmd7WIqfUsV_VRbric8/s800/EAB_technorati%20icon.png" /></a>
</td>
<td>
<td>
</td>
</td>
</tr>
</table>
</center>
3. Change the blue highlight "width:170px;" change the widht change according to your wishes.
4. Change the red highlight with your url link.
5. Save template, Done and look the widget!!!
Read Full Post

Html colours codes charts


Color Codes Chart

COLOR NAME
COLOR CODE
COLOR PREVIEW
Black
#000000

Gray1
#150517

Gray2
#250517

Gray3
#2B1B17

Gray4
#302217

Gray5
#302226

Gray6
#342826

Gray7
#34282C

Gray8
#382D2C

Gray9
#3b3131

Gray10
#3E3535

Gray11
#413839

Gray12
#41383C

Gray13
#463E3F

Gray14
#4A4344

Gray15
#4C4646

Gray16
#4E4848

Gray17
#504A4B

Gray88
#544E4F

Gray19
#565051

Gray20
#595454

Gray21
#5C5858

Gray22
#5F5A59

Gray23
#625D5D

Gray24
#646060

Gray25
#666362

Gray26
#696565

Gray27
#6D6968

Gray28
#6E6A6B

Gray29
#726E6D

Gray30
#747170

Gray
#736F6E

Slate Gray4
#616D7E

Slate Gray
#657383

Light Steel Blue4
#646D7E

Light Slate Gray
#6D7B8D

Cadet Blue4
#4C787E

Dark Slate Gray4
#4C7D7E

Thistle4
#806D7E

Medium Slate Blue
#5E5A80

Medium Purple4
#4E387E

Midnight Blue
#151B54

Dark Slate Blue
#2B3856

Dark Slate Gray
#25383C

Dim Gray
#463E41

Cornflower Blue
#151B8D

Royal Blue4
#15317E

Slate Blue4
#342D7E

Royal Blue
#2B60DE

Royal Blue1
#306EFF

Royal Blue2
#2B65EC

Royal Blue3
#2554C7

Deep Sky Blue
#3BB9FF

Deep Sky Blue2
#38ACEC

Slate Blue
#357EC7

Deep Sky Blue3
#3090C7

Deep Sky Blue4
#25587E

Dodger Blue
#1589FF

Dodger Blue2
#157DEC

Dodger Blue3
#1569C7

Dodger Blue4
#153E7E

Steel Blue4
#2B547E

Steel Blue
#4863A0

Slate Blue2
#6960EC

Violet
#8D38C9

Medium Purple3
#7A5DC7

Medium Purple
#8467D7

Medium Purple2
#9172EC

Medium Purple1
#9E7BFF

Light Steel Blue
#728FCE

Steel Blue3
#488AC7

Steel Blue2
#56A5EC

Steel Blue1
#5CB3FF

Sky Blue3
#659EC7

Sky Blue4
#41627E

Slate Blue
#737CA1

Slate Blue
#737CA1

Slate Gray3
#98AFC7

Violet Red
#F6358A

Violet Red1
#F6358A

Violet Red2
#E4317F

Deep Pink
#F52887

Deep Pink2
#E4287C

Deep Pink3
#C12267

Deep Pink4
#7D053F

Medium Violet Red
#CA226B

Violet Red3
#C12869

Firebrick
#800517

Violet Red4
#7D0541

Maroon4
#7D0552

Maroon
#810541

Maroon3
#C12283

Maroon2
#E3319D

Maroon1
#F535AA

Magenta
#FF00FF

Magenta1
#F433FF

Magenta2
#E238EC

Magenta3
#C031C7

Medium Orchid
#B048B5

Medium Orchid1
#D462FF

Medium Orchid2
#C45AEC

Medium Orchid3
#A74AC7

Medium Orchid4
#6A287E

Purple
#8E35EF

Purple1
#893BFF

Purple2
#7F38EC

Purple3
#6C2DC7

Purple4
#461B7E

Dark Orchid4
#571B7e

Dark Orchid
#7D1B7E

Dark Violet
#842DCE

Dark Orchid3
#8B31C7

Dark Orchid2
#A23BEC

Dark Orchid1
#B041FF

Plum4
#7E587E

Pale Violet Red
#D16587

Pale Violet Red1
#F778A1

Pale Violet Red2
#E56E94

Pale Violet Red3
#C25A7C

Pale Violet Red4
#7E354D

Plum
#B93B8F

Plum1
#F9B7FF

Plum2
#E6A9EC

Plum3
#C38EC7

Thistle
#D2B9D3

Thistle3
#C6AEC7

Lavender Blush2
#EBDDE2

Lavender Blush3
#C8BBBE

Thistle2
#E9CFEC

Thistle1
#FCDFFF

Lavender
#E3E4FA

Lavender Blush
#FDEEF4

Light Steel Blue1
#C6DEFF

Light Blue
#ADDFFF

Light Blue1
#BDEDFF

Light Cyan
#E0FFFF

Slate Gray1
#C2DFFF

Slate Gray2
#B4CFEC

Light Steel Blue2
#B7CEEC

Turquoise1
#52F3FF

Cyan
#00FFFF

Cyan1
#57FEFF

Cyan2
#50EBEC

Turquoise2
#4EE2EC

Medium Turquoise
#48CCCD

Turquoise
#43C6DB

Dark Slate Gray1
#9AFEFF

Dark Slate Gray2
#8EEBEC

Dark Slate Gray3
#78c7c7

Cyan3
#46C7C7

Turquoise3
#43BFC7

Cadet Blue3
#77BFC7

Pale Turquoise3
#92C7C7

Light Blue2
#AFDCEC

Dark Turquoise
#3B9C9C

Cyan4
#307D7E

Light Sea Green
#3EA99F

Light Sky Blue
#82CAFA

Light Sky Blue2
#A0CFEC

Light Sky Blue3
#87AFC7

Sky Blue
#82CAFF

Sky Blue2
#79BAEC

Light Sky Blue4
#566D7E

Sky Blue
#6698FF

Light Slate Blue
#736AFF

Light Cyan2
#CFECEC

Light Cyan3
#AFC7C7

Light Cyan4
#717D7D

Light Blue3
#95B9C7

Light Blue4
#5E767E

Pale Turquoise4
#5E7D7E

Dark Sea Green4
#617C58

Medium Aquamarine
#348781

Medium Sea Green
#306754

Sea Green
#4E8975

Dark Green
#254117

Sea Green4
#387C44

Forest Green
#4E9258

Medium Forest Green
#347235

Spring Green4
#347C2C

Dark Olive Green4
#667C26

Chartreuse4
#437C17

Green4
#347C17

Medium Spring Green
#348017

Spring Green
#4AA02C

Lime Green
#41A317

Spring Green
#4AA02C

Dark Sea Green
#8BB381

Dark Sea Green3
#99C68E

Green3
#4CC417

Chartreuse3
#6CC417

Yellow Green
#52D017

Spring Green3
#4CC552

Sea Green3
#54C571

Spring Green2
#57E964

Spring Green1
#5EFB6E

Sea Green2
#64E986

Sea Green1
#6AFB92

Dark Sea Green2
#B5EAAA

Dark Sea Green1
#C3FDB8

Green
#00FF00

Lawn Green
#87F717

Green1
#5FFB17

Green2
#59E817

Chartreuse2
#7FE817

Chartreuse
#8AFB17

Green Yellow
#B1FB17

Dark Olive Green1
#CCFB5D

Dark Olive Green2
#BCE954

Dark Olive Green3
#A0C544

Yellow
#FFFF00

Yellow1
#FFFC17

Khaki1
#FFF380

Khaki2
#EDE275

Goldenrod
#EDDA74

Gold2
#EAC117

Gold1
#FDD017

Goldenrod1
#FBB917

Goldenrod2
#E9AB17

Gold
#D4A017

Gold3
#C7A317

Goldenrod3
#C68E17

Dark Goldenrod
#AF7817

Khaki
#ADA96E

Khaki3
#C9BE62

Khaki4
#827839

Dark Goldenrod1
#FBB117

Dark Goldenrod2
#E8A317

Dark Goldenrod3
#C58917

Sienna1
#F87431

Sienna2
#E66C2C

Dark Orange
#F88017

Dark Orange1
#F87217

Dark Orange2
#E56717

Dark Orange3
#C35617

Sienna3
#C35817

Sienna
#8A4117

Sienna4
#7E3517

Indian Red4
#7E2217

Dark Orange3
#7E3117

Salmon4
#7E3817

Dark Goldenrod4
#7F5217

Gold4
#806517

Goldenrod4
#805817

Light Salmon4
#7F462C

Chocolate
#C85A17

Coral3
#C34A2C

Coral2
#E55B3C

Coral
#F76541

Dark Salmon
#E18B6B

Salmon1
#F88158

Salmon2
#E67451

Salmon3
#C36241

Light Salmon3
#C47451

Light Salmon2
#E78A61

Light Salmon
#F9966B

Sandy Brown
#EE9A4D

Hot Pink
#F660AB

Hot Pink1
#F665AB

Hot Pink2
#E45E9D

Hot Pink3
#C25283

Hot Pink4
#7D2252

Light Coral
#E77471

Indian Red1
#F75D59

Indian Red2
#E55451

Indian Red3
#C24641

Red
#FF0000

Red1
#F62217

Red2
#E41B17

Firebrick1
#F62817

Firebrick2
#E42217

Firebrick3
#C11B17

Pink
#FAAFBE

Pink2
#E7A1B0

Pink3
#C48793

Pink4
#7F525D

Light Pink
#FAAFBA

Light Pink1
#F9A7B0

Light Pink2
#E799A3

Light Pink3
#C48189

Light Pink4
#7F4E52

Rosy Brown
#B38481

Rosy Brown1
#FBBBB9

Rosy Brown2
#E8ADAA

Rosy Brown3
#C5908E

Rosy Brown4
#7F5A58

Lavender Blush4
#817679

Light Goldenrod4
#817339

Lemon Chiffon4
#827B60

Lemon Chiffon3
#C9C299

Light Goldenrod3
#C8B560

Light Golden2
#ECD672

Light Goldenrod
#ECD872

Light Goldenrod1
#FFE87C

Lemon Chiffon2
#ECE5B6

Lemon Chiffon
#FFF8C6

Light Goldenrod Yellow
#FAF8CC
    
Read Full Post