As my previous post about how to use a different color on the comment author or admin in the comments field, the techniques we use are not much different but just a little added background image for the admin.
In addition to adding logos or images admin, we also add some style by adding a different background color for comments so it will look different authors with comments from visitors.
View Live Demo Here
Now I will describe two different methods:
1. Methods for the default template from blogger,
2. The method of the web design templates.
Admin add a logo plus a different color for admin in the comments bloggers
1. Log into your blogger account.
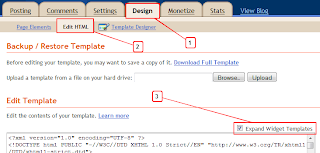
2. Select the "design" on the blogger dashboard you continue to click>> "Edit html" do not forget to tick the box 'Expand widget templates"
2. Select the "design" on the blogger dashboard you continue to click>> "Edit html" do not forget to tick the box 'Expand widget templates"
. Comment-body-author {background: url("http://spiceupyourblogextras.googlecode.com/files/admin.gif") no-repeat scroll right bottom #BFE3FE; border: 1px solid #80C8FE;-Moz-border- radius: 6px;-webkit-border-radius: 6px; padding: 3px 5px 3px 35px;}
Note:
Url of yellow you can change the image you want, while the blue is the color code the background.
To know the color code can be viewed here HTML colors code chart.
4. The next step save your template, but we are not finished.
In the next step, you must find the code snippets below and add some code between the code. As I explained above that I will explain the steps in the two methods ie. Methods for the default template from blogger, and Methods for the template from the web design.
The first method (Method for the default template from blogger)
1. Find the code snippet below. (Use ctrl + f)
<dd class='comment-body'> <b:if cond='data:comment.isDeleted'> <span class='deleted-comment'> <data:comment.body/> </ span> <b: else /> <p> <data:comment.body/> </ p> </ b: if> </ dd>2. Once you find the code above, now add the code below the above code on no. 1
<b:if cond='data:comment.author == data:post.author'> <dd class='comment-body-author'> <p> <data:comment.body/> </ p> </ dd> <b:else/>
3. Next add the code </ b: if> below code at no. 1
So will be like this.
<b:if cond='data:comment.author == data:post.author'> <dd class='comment-body-author'> <p> <data:comment.body/> </ p> </ dd> <b:else/><dd class='comment-body'> <b:if cond='data:comment.isDeleted'> <span class='deleted-comment'> <data:comment.body/> </ span> <b: else /> <p> <data:comment.body/> </ p> </ b: if> </ dd></ B: if><dd class='comment-footer'> <span class='comment-timestamp'> <a expr:href='"#comment-" + data:comment.id' title='comment permalink'> <data: comment . timestamp /> </ A> <b:include data='comment' name='commentDeleteIcon'/> </ span> </ dd> </ b: loop> </ IN>4. Save your template and see the results.
Second methods (Methods for the template from the web design)
1. Now we need to edit the following code in your template. Find the code below (Use ctrl + f to search methods). Keep in mind if you do not find the code below, look for code that is almost similar because each has a different encoding templates.
<dd class='comment-body' expr:id='data:widget.instanceId data:comment.cmtBodyIdPostfix'> <b:if cond='data:comment.isDeleted'> + <span class = 'deleted-comment' > <data:comment.body/> </ span> <b:else/> <p> <data:comment.body/> </ P> </ b: if> </ dd>
2. Once you find the code above, now add the code below the above code on no. 1
<b:if cond='data:comment.author == data:post.author'> <dd class='comment-body-author'> <p> <data:comment.body/> </ p> </ dd> <b:else/>
3. Next add the code </ b: if> below code at no. 1
So it will be like this
<b:if cond='data:comment.author == data:post.author'> <dd class='comment-body-author'> <p> <data:comment.body/> </ p> </ dd> <b:else/> <dd class='comment-body' expr:id='data:widget.instanceId data:comment.cmtBodyIdPostfix'> <b:if cond='data:comment.isDeleted'> + <span class = 'deleted-comment' > <data:comment.body/> </ span> <b:else/> <p> <data:comment.body/> </ P> </ b: if> </ dd> </ B: if> <dd class='comment-footer'> <span class='comment-timestamp'> <a expr:href='data:comment.url' title='comment permalink'> <data:comment.timestamp/> </ A> <b:include data='comment' name='commentDeleteIcon'/> </ span> </ dd> </ b: loop> </ IN> </ div>
4. Once satisfied to save your template and see the results.
I hope this post can be useful for you, See also other tutorials about the blogger's comments.
If you have questions please post your comment.


0 comments:
Post a Comment