Showing posts with label blogger tips. Show all posts

How to test Speed Blog Loading for better SEO and Indexed


Yes, speed of your blog is very important to get SEO (search engine optimatization) and better indexed by search engines, the faster your blog's loading the better your blog will be indexed by search engines. Anyway, in earlier post about Blogging I have posted an article Test your blog/web speed using Stopwatch helps you identify which items are taking the longest to load. And now you can even test your blog/web speed even better using toold fromPingdom(dot)com with very detail results such as: Total loading time, Total objects (KB), (X)HTML, RSS/XML, CSS, Scripts, Images, Plugins, and more.


How does it works?

All you need to do is visit this link http://tools.pingdom.com/, then you type your blog/web URL address there then click "Test Now" button, afte that you will see your blog results which the Full Page Test loads a complete HTML page including all objects (images, CSS, JavaScripts, RSS, Flash and frames/iframes). It mimics the way a page is loaded in a web browser. The load time of all objects is shown visually with time bars. You can view the list of objects either in load order or as a hierarchy. The hierarchy view allows you to see which objects are linked to in for example a CSS file. Every test also shows general statistics about the loaded page such as the total number of objects, total load time, and size including all objects.


Once you've typed your blog/web URL address on Pingdom, you will see the result I mentioned above with a very detail, as you can see in the screenshot below forbloggerclick.com


Well, if you think your blog/web get a slowly respond in loading, it is better for you to remove some of widgets, and also you can minimize your blog "home" by putting them at least about article posts max 5 posts in there.
Read Full Post

How to change fonts on the blogger

After fiddling with html and css code to change font in blogspot/blogger and i found a way to chage the font bloggers. For years, bloggers and web design using a simple font styles and templates for their blogs. But now google has launched their new service the google web fonts. This service allow us to use custom fonts on the font of blogger to the google directory for use on our blog/website.

I'l give you the steps to change the fonts on the blog so your blog looks more beautiful.

How to change fonts on the blogger

1. Log into your blogger account. 
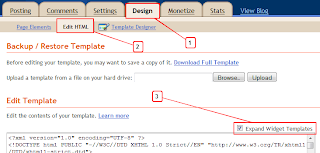
2. Select the "design" the blogger dashbosrd you continue to click>> "Edit html" do not forget to tick the box "Expand widget template "
 
3. Find a piece of code <head> and save the code below after/below code <head> 
<link href='http://fonts.googleapis.com/css?family=Ubuntu:bold' rel='stylesheet' type='text/css'/>
<link href='http://fonts.googleapis.com/css?family=Vollkorn' rel='stylesheet' type='text/css'/>
<link href='http://fonts.googleapis.com/css?family=Lobster' rel='stylesheet' type='text/css'/>
<link href='http://fonts.googleapis.com/css?family=Smythe' rel='stylesheet' type='text/css'/>
<link href='http://fonts.googleapis.com/css?family=Philosopher' rel='stylesheet' type='text/css'/>
<link href='http://fonts.googleapis.com/css?family=Tangerine' rel='stylesheet' type='text/css'/>
<link href='http://fonts.googleapis.com/css?family=Holtwood+One+SC' rel='stylesheet' type='text/css'/>
4. Next, find the 
font-family: 'arial', Georgia, Times, serif; 
Note:
Change the blue code with the green font code

Fow example:
font-family: 'arial', Georgia, Times, serif; (arial change to Smythe) 
the change like this
font-family: 'Smythe', Georgia, Times, serif; 


You can also set the font to appear on:

  • Header
  • Blog title
  • Post artices
  • Sidebar
  • Footer
  • Or wherever you like
Hopefully this article can help you to make your blog beautiful.
Read Full Post

Light Hover With CSS Horizontal Menu For Blogger

Light Hover With CSS Horizontal Menu For Blogger. This post I will try to give you tips on the menu bloggers . The title that I take is Light Horizontal Hover Menu meaning Menu Horizontal / Horizontal to be shiny as the highlight by the cursor. 
To make it please you follow the stages below:

1. Blogger Log Into You
2. Select Design
3. Select Edit HTML
4. Save the following CSS code above </ head>
<style type='text/css'> # Nav { width: 100%; margin-left:-40px; background: url (https://blogger.googleusercontent.com/img/b/R29vZ2xl/AVvXsEjH4Nv_4AjdRuag1FS-nHdyxMzTMpaJziIT0ZQz5r7weOE4mg1o9tvsC_Oy-fS4ug-oSnYmsfUHepmZK_xbF6aixxCGdaip4Ok2ytHiL9wAAkemBASjrHLCZgj-58yqQN6S3fmELFVVJP_s//) repeat-x; 
# Nav li { float: left; display: block; 
# Nav li a { float: left; display: block; padding: 12px 18px 12px 18px; text-transform: uppercase; text-decoration: none; background: url (http://lh3.ggpht.com/_7ZIYPUkIUEw/TNWkoQFUrEI/AAAAAAAAAFA/3RlsV_UOXlo/navi-bg.jpg) no-repeat top right; color: # ffffff; 
# Nav li a: hover { background: url (http://lh3.ggpht.com/_7ZIYPUkIUEw/TNWkoQFUrEI/AAAAAAAAAFA/3RlsV_UOXlo/navi-bg.jpg) no-repeat right-40px; color: # ffffff; text-decoration: none; 
ul # nav li.activee a, ul # nav-cat a {li.current color: # fff; background: url (http://lh3.ggpht.com/_7ZIYPUkIUEw/TNWkoQFUrEI/AAAAAAAAAFA/3RlsV_UOXlo/navi-bg.jpg) no-repeat right-80px; 
# Nav li ul { display: none; </ Style>
5. Now you find the following code:
 <div id='header-wrapper'> <b:section class='header' id='header' maxwidgets='1' showaddelement='no'> <b:widget id='Header1' locked='true' title='test (Header)' type='Header'/> </ B: section> </ Div>
6. Save the following code after the code above  
<ul id='nav'> 
<li class='activee'> <a href='/'> Home </ a> </ li> 
<a href=' # 'title='MENU 1'> MENU 1 </ a> </ li> 
<a href=' # 'title='MENU 2'> MENU 2 </ a> </ li> 
<a href=' # 'title='MENU 3'> MENU 3 </ a> </ li> 
<a href=' # 'title='MENU 4'> MENU 4 </ a> </ li> 
<a href=' # 'title='MENU 5'> MENU 5 </ a> </ li> 
<a href='#' title='MENU 6'> MENU 6 </ a> </ li> 
</ Ul>
Description: Please replace the word MENU on the menu are you going to show, do not forget to also fill out a link that will be addressed by your menu. 


Example: 
<a href='http://www.mybuxx.com/' title='Blog Tutorial'> Blog Tutorial </ a> </ li>
7. Save the template you 
Hopefully useful and Thanks 
Read Full Post

Create and Modify Breadcrumb Navigation In Blog

MAKE MODIFICATIONS TO BLOG NAVIGATION breadcrumb

actually post that discusses the breadcrumb navigation is already widely known, but I'm sure of many who know it, still more who do not know about making this breadcrumb navigation. 
With the breadcrumb navigation makes it easier for readers because they will know where their current position (was reading an article page). Usually the storage location of the breadcrumb navigation is located above the title of our posts that will appear only on post pages only.


To make this breadcrumb navigation you can follow the steps below: 


1. Login to your blogger 
2. Select Plan ---> EDIT HTML (check expand widgets template) 
3. Save the following CSS code above ]]></ b: skin> 

. Breadcrumbs { padding: 5px 5px 5px 0; margin: 0; font-size: 95%; line-height: 1.4em; border-bottom: 4px double # cadaef; }
4. then leaving you to find the following code:
<div class='post hentry uncustomized-post-template'>
5. Save the following code after the code No.. 4
<b:if cond='data:blog.homepageUrl == data:blog.url'> <b:else/> <b:if cond='data:blog.pageType == "item"'> <div class='breadcrumbs'> Browse »<a expr:href='data:blog.homepageUrl'> Home </ a>» <b:if cond='data:post.labels'> <b:loop values='data:post.labels' var='label'> <a expr:href='data:label.url' rel='tag'> <data:label.name/> </ a> <b:if cond='data:label.isLast != "true"'>, </ b: if> </ B: loop> </ B: if> »<data:post.title/> </ Div> </ B: if> </ B: if>
6. Save your template

The result will be like this:
 

Browse »Home» Labels, labels, labels »Post Title
Notes:
  • You can replace the word Browse and Home on the above code, for example pake your word here, Houses, etc.
  • color on the bottom line for breadcrumb navigation you can change the CSS code above exactly code # cadaef

Actually making the navigation is complete, but I'll share a little to modify this breadcrumb navigation:

^ ^ Changing the Home with Pictures

To change the word HOME 
to the picture you can add the following code:

<img alt='Home' src=' HOME YOUR IMAGE URL'/>
Paste in the HTML above to replace the word HOME, so the result is like this: 
<b:if cond='data:blog.homepageUrl == data:blog.url'> <b:else/> <b:if cond='data:blog.pageType == "item"'> <div class='breadcrumbs'> Browse »<a expr:href='data:blog.homepageUrl'> <img alt='Home' src=''/> YOUR HOME IMAGE URL </ a>» <b:if cond='data:post.labels'> <b:loop values='data:post.labels' var='label'> <a expr:href='data:label.url' rel='tag'> <data:label.name/> </ a> <b:if cond='data:label.isLast != "true"'>, </ b: if> </ B: loop> </ B: if> »<data:post.title/> </ Div> </ B: if> </ B: if>
The result will be like this: 


May be useful, can be practiced and thank you.
Read Full Post